 Grub2config HELP
Last update: 2024-09-15
Contents
1. What is this?
Puppy Linux is ever using Grub4Dos as the bootup loader. But the Grub4Dos does not support GPT/UEFI system, which is new standard of the recent PC's. Grub2config is a tool installs the grub2 boot loader and makes the boot menu automatically probing intalled systems same way as the old Grub4DosConfig, enabling multiboot with Windows, Ubuntu and etc.. It supports both legacy MBR system and new GPT/UEFI. Grub2config supports UEFI Secure boot thanks to the Gyrog's MOK manager.
Grub2config installs only the boot loader. You can install Puppies manually or using some tool like Frugalinstaller.
Requirements
Grub2config runs only on recent Puppy Linux, XenialPup-7.5 and later. Grub2config requires efibootmgr, blkid. Also needs gtkdialog and some puppy script, probedisk, probepart.
Online resources
Grub2config and Furugalinstaller available from http://shinobar.server-on.net/puppy/opt/
2. BIOS Settings
'Secure Boot' is enabled in recent Windows PC. Grub2config supports this case, but it is better to disable 'Secure Boot'. Otherwise, you need a bit annoying operation, once for one PC, written in the next section.
You can boot the BIOS by presing the some key(*) repeatedly immediately after powering on. Once the BIOS is booted, find the "Secure Boot" item and disable it.
(*) Usually [F2] or [Del] but see the manual or search the net,
Secure boot
Grub2config supports UEFI Secure boot thanks to the Gyrog's MOK manager. The key file is 'puppy.cer' placed at the top of the disk. You need to register the key once for one PC. See the Gyrog's MOK manager page.
- On the first boot with Secure Boot enabled, you should see ERROR on blue screen. To continue, press Enter.
- Next blue screen titled Shim UEFI management shows Press Any key to perform MOK maneger . Press Enter. again.
- Next titled Perform MOK management . Select Enrolel key from disk using up/down keys, and press Enter.
- Next titled Select Key . Maybe selected the first line. Press Enter.
- Next again titled Select Key shows the content of the disk. Sellect puppy.cer , and press Enter.
3. Installing Grub2
Partition format and the flag
Grub2config supports partition table both MBR(or called 'msdos') and GPT. Anyway, the first partition of the drive should be formatted with 'fat32' file system as the boot partition. Before the first partition need preceeding 1MB gap sapce. It is the default when using tools like GParted.
And the partition should be flagged to indicate the partition is the boot partition. The flag is 'boot' for MBR and 'esp' for GPT disks.
The partition and the flag can be manipulated using the GParted or some other tools.
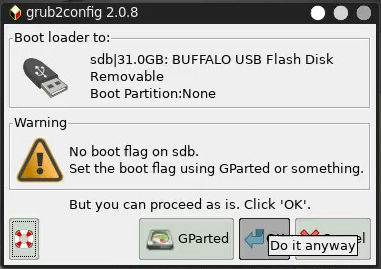
Grub2Config warns if the boot flag is missing. You can edit the flag using GParted. But you can proceed without boot flag. The boot flag does not matter under some BIOS.
Where to install?
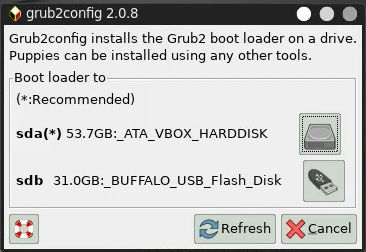
Normally boots off from the 1st HDD, shown as 'sda' or 'hda'. But you can install the boot loader on another drive (if you have).
Maybe it is more safe way to install the boot loader on a USB flash memory drive, rather than internal HDD. Note that this way is usable only in case your PC has the ability of booting up from USB drives and you know the BIOS settings to enable it.
Installing on a floppy disk is not supported,
Supported File System
Windows on legacy BIOS may have the boot partition at the first partition(sda1) with NTFS file system. In this case, UEFI boot is not supported..
Puppy and other Linux can be installed, besides the boot partition, on any drives, partitions with supported file systems listed here:
vfat(fat32), ntfs, ext2, ext3, ext4(with/no 64bit option), reiserfs, btrfs, xfs, hfs, hfs+.
Note that it does not mean your Puppy supports all these file systems.
4. Grub2config options
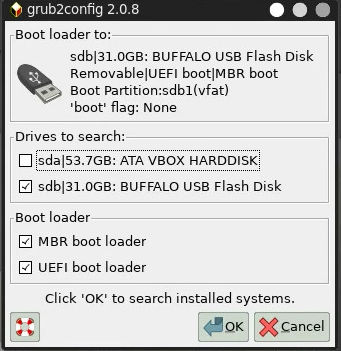
Drives to search
Grub2config automatically detects installed systems and make the menu.
Check on the each drive you like to search.
If all the checks are off, probing not performed and the menu file is kept if exists.
MBR boot loader
Install boot loader so that legacy MBR bootable.
Disabled if the partition table is 'GPT'
UEFI boot loader
Install boot loader so that UEFI bootable. It is the default style for 'GPT' partition table.
No boot loader are installed if MBR and UEFI boot loader are both off.
5. Menu titles
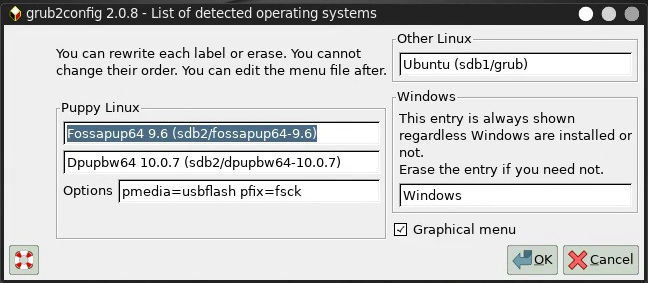
Grub2config searches in the internal HDD and connected external HDD and lists up installed Puppy's and other Linux operating systems.
You can rewrite the string in the boxes which will be shown in the menu at bootup. Erase it (fill with blank) if you want to remove the item from the bootup menu. But caution! Only rewrite or erase, you can do for this dialog. You cannot add new item nor arrange the order here. You can manually edit the menu file after install finished.
Boot options
You can add boot options for 'frugal' installed Puppy. See the 'Adding bootup options' section of this document. Keep the entry as is if you are unsure.
Windows menu
At least one item of Windows menu are displayed here no matter they are installed or not. Erase the items if you do not need boot up Windows. But this entry is recommended to leave in case you install the boot loader on removable devices because they might be useful with other PC's.
Graphical menu
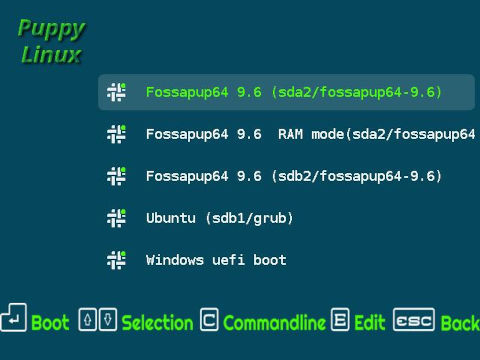
Grub2Config makes the boot menu with graphical icons. Check off the checkbox if you like simple boot menu.
6. Editing menu file
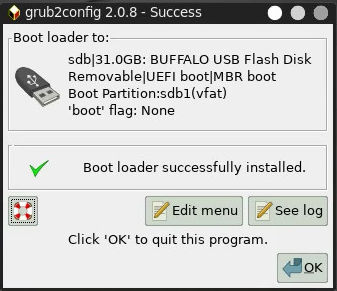
Once the grub2 install is completed, you can edit the menu file by the text editor. The menu file is '$TOPDIR/grub.cfg', where the '$TOPDIR' is the mount moint of the drive.
What case we need editing?
Grub2config produce menu file automatically. But you might need editing menu file in case Puppy is full installed. In case Puppy is frugal installed and other operating systems are only Windows, probably you can use the automatically produced menu with no problem.
Listing order
You can change the order of the menu items. Cut the lines from the 'menuentry'-line to the line before the next 'menuentry'-line, and paste them to proper position.
Full installed systems
Other than Puppy Linux, the boot options may need manual arrangement. Grub2config uses the partition UUID to set the starting partition, independent from the drive arrangement. But you need to care options, such as where is the root file system, and something depends on each distribution and installation.
Adding bootup options(parameters)(both Frugal/Full install)
Produced menu file has normal boot options. You can add another options like 'acpi=off'.
Grub2config adds 'pmedia=usbflash' or 'pmedia=usbhd' option in case the drive is connected to USB interface. Rewrite them if they are wrong. You are better to take the boot option 'pmedia=ataflash' for SSD instead of 'pmedia=atahdd', 'pmedia=usbhdd' for USB HDD rather than 'pmedia=usbflash'.
Refer to BootParmmeters.
Classic Puppy
Classic Puppy's (1.x-3.x) have special boot parameter than Puppy-4.x/5.x. You need to manually edit the boot parameters. As for the Classic Pup-2.x, visit the topic on Forum.
RAM mode
This mode boots up Puppy with 'pfix=ram'. Then the Puppy boots up without any pupsave. It is usefull when your pupsave is corrupt. Another case is you are trying new version of Puppy and do not want to update old pupsave. Also usefull when you do not want to mount the HDD to manipulate it, for example, to restructure the partitions. But note that it depends on the Puppy version if the HDD is mounted or not with this mode. This menu item is available only for the frugal installation.
Old menu
The old 'grub.cfg' probably there if Grub2 has ever been installed. The top '/grub.cfg' is renamed as '/grub-prev.cfg'.
Custom menu
You can put '/custom.cfg' as the custom menu file. You can add another entries like the bellow.
menuentry "My Puppy"{
		search --set=root --no-floppy --file /mypuppy/vmlinuz
		linux /mypuppy/vmlinuz psubdir=mypuppy pmedia=atahd pfix=fsck
		initrd /mypuppy/initrd.gz
	}
The custom menu file '/custom.cfg' remains as is
even the main menu file '/grub.cfg' is refreshed at the Grub2config runs.
Default Settings
You can find the text file /usr/share/doc/grub2config/grub. Copy the file to /etc/default/grub and you can edit the parameters. Note that the path is of the puppy file system saved in the pupsave, not of the partition.
# Copy this file to /etc/default/grub and edit.
# /grub.cfg is updated when Grub2Config run.
GRUB_DEFAULT=0		;# default menu item counts from 0
GRUB_TIMEOUT=10	;# time out in seconds
GRUB_PUPPY_DEPTH=2	;# 2 :top subfolder, 3 :one more deeper level
GRUB_PUPPY_ADDOPTION_DEFAULT="pfix=fsck"
GRUB_CMDLINE_LINUX_DEFAULT="quiet splash"
Rerun Grub2config to update the menu file.
That's all. Enjoy Puppy! Shinobar